|
| 
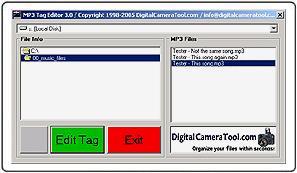
Standard Features:
Click here for Screen Shot
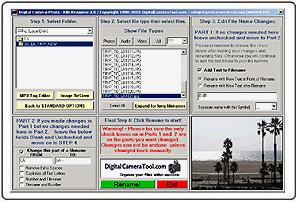
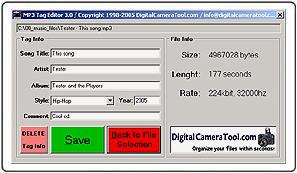
Advanced Features:
Click here for Screen Shot
|
|
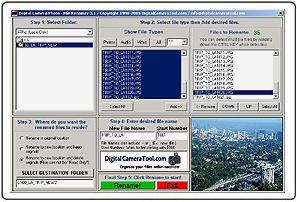
Standard Instructions:
- Step 1: Select and double click the folder where the files you want to rename are.
- Step 2: Pick the file type/s you want to rename. Use the buttons for all photos,
audio
or video types. Or use the drop down menu for individual types.
Next, from the list of files in the left "Show
File Types" box in Step 2, you can
select the files to be renamed. Click Select All or click each file and
press the Add button or hold down the Ctrl button on your keyboard and at the same time use
your mouse to
click each file you would like renamed then click the Add button.
After clicking Add, the selected
files move to the right box.
If you would like to change the order and placement of the files before renaming and
numbering, click the file to be moved and use the Down or Up buttons to move.
Do this for each file you
would like moved.
- Step 3: Select what to do with the renamed files?
- Step 4: What do you want to name the renamed files? You can use any text, number, space and
either - or _ in the name.
Next, select the starting number. This can be any number but works better if you
start at 101 or 1001.
- Step 5: Last step, Press the Rename button.
Advanced Instructions:
- Step 1: Select and double click the folder where the files you want to rename are.
- Step 2: Pick the file type/s you want to rename. Use the buttons for all photos,
audio
or video types. Or use the drop down menu for individual types.
Next, from the list of files in the "Show File
Types" box, you can select the files to
be renamed. Click Select All or hold down the Ctrl button on your
keyboard and at
the same time use your mouse to click each file you would like renamed.
- Step 3: Part 1 To use, click Add text to filename on. Here you can add text
before or
after existing filename. You can also use a space, - or _ to separate the new text and filename by using the drop down menu.
(If you have no need for Part 1, do
not click Add text to filename and then move on to Part 2)
- Step 3: Part 2 If you made changes in Part 1 but no changes are needed in Part 2, leave fields blank
and unchecked. Then move on to Step 4.
Otherwise here you can do the following:
Use Change this part of a filename to add or remove any text, number, space, -
or _ symbol. If you want to remove
something but not replace it then leave the To:
box blank.
Also available: Remove extra spaces and Capitalize all first letters.
The Number and Filename or Filename and Number adds
a starting number of
001 before or after the existing filename.
- Step 4: When you finish making your selections or filename changes click Rename.
|
|